USB Interface Solutions
|
These compact interface controllers meet a wide range of application
requirements for USB control of displays and other peripherals via a
virtual COM port or using the generic printer emulation. They are also
capable of receiving data for transmission to the host PC also as a COM
port or an HID keyboard interface. Custom software solutions are
available.
|
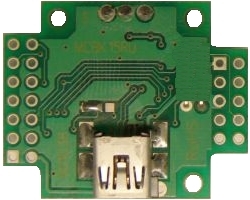
KBR38A-USB2
Display Interface Controller
Features
- ° USB 2.0 compatible
- ° Uses built in Windows drivers
- ° serial COM port mode
- ° IR keyboard interface mode
- ° new Generic Printer emulation mode
- ° parallel and serial output interfaces
- ° Power and data from USB port
- ° ideal for development/testing
- ° external 5V supply option
|
| part number |
interfaces |
spec |
| KBR38A-USB2 |
Serial |

|
|
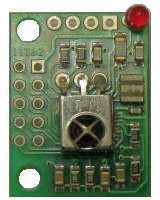
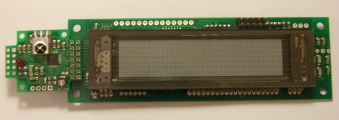
This USB2.0 interface controller supports SPI and asynchronous
serial interfaces at various baud rates in a small PCB footprint.
An IR receiver compatible with the low cost KBC56A
keyboard allows remote set up and control. It can be
configured on the fly as one of 3 USB devices, a bi-directional COM port,
a combined PC keyboard and mouse and a generic printer for use with
existing software print routines. This product supports our Modmaster
development system which provides rapid display demonstration capability
for management presentation and firmware development.
Tests show that many displays requiring up to 450mA at 5VDC can be
directly powered from the USB supply.
|
KBR38A-USB3
Display Interface Controller
Features
- ° USB 2.0 compatible
- ° Uses built in Windows drivers
- ° serial COM port mode
- ° IR keyboard interface mode
- ° new Generic Printer emulation mode
- ° parallel and serial output interfaces
- i80, M68 bi-directional bus.
- SPI, async, RS232, RS485
- ° Power and data from USB port
- ° ideal for development/testing
- ° external 5V supply option
|
| part number |
interfaces |
spec |
| KBR38A-USB3 |
Parallel + Serial |
|
|
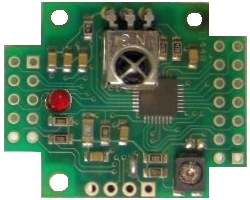
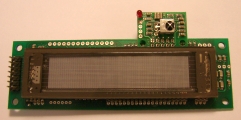
This USB2.0 interface controller supports 8 bit parallel, SPI and asynchronous
serial interfaces at various baud rates in a small PCB footprint. The KBR38A-USB3
on-board potentiometer enables the bias voltage to be set for most 5x7
character LCDs and an IR receiver compatible with the low cost KBC56A
keyboard allows remote set up and control. It can be
configured on the fly as one of 3 USB devices, a bi-directional COM port,
a combined PC keyboard and mouse and a generic printer for use with
existing software print routines. This product supports our Modmaster
development system which provides rapid display demonstration capability
for management presentation and firmware development.
Tests show that many displays requiring up to 450mA at 5VDC can be
directly powered from the USB supply.
|
|
Downloads
KBR38A-USB2/3 Windows Inf File
Driver file for KBR38A-USB2, KBR38A-USB3, KBR38A-USB2P, KBR38A-USB3P.
Latest Version V2.0.0.0
° Download ItronUsb.inf File. (Size 2.43KB)
The file is available for download as a '.zip' file if you have problems downloading the '.inf'.
Un-zip and store the enclosed .inf file in a suitable directory on your
PC.
° Download ItronUsb.zip File. (Size 1.06KB)
|
|
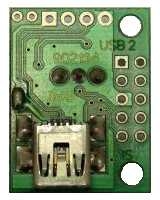
Installation
KBR38A-USB2/3 COM Port
Before connecting the KBR38A-USB2/3 to your computer for the first time, download the driver '.inf' file
from here. The operating system will request
this later during installation.
1. Plug the KBR38A-USB2/3 into your PC. Then configure the device as follows:

2. Operating System recognises USB Device.

3. Operating System recognises USB Device.
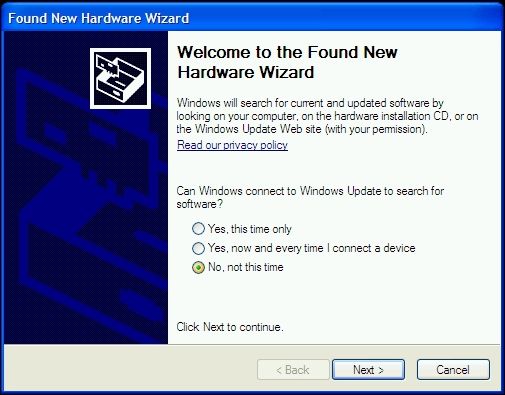
4. The Hardware Wizard runs and requests to search for the driver. Click 'No, not at this time'
and then 'Next >'.
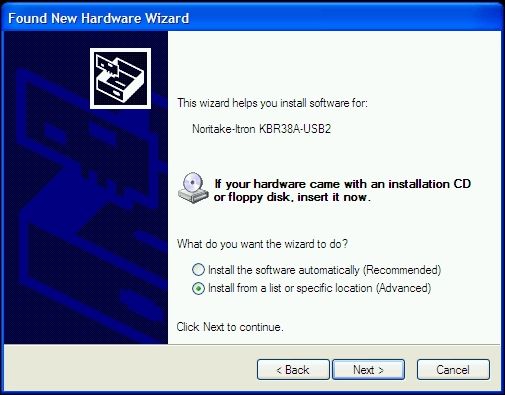
5. Select 'Install from a list or specific location (Advanced)' and then 'Next >'.
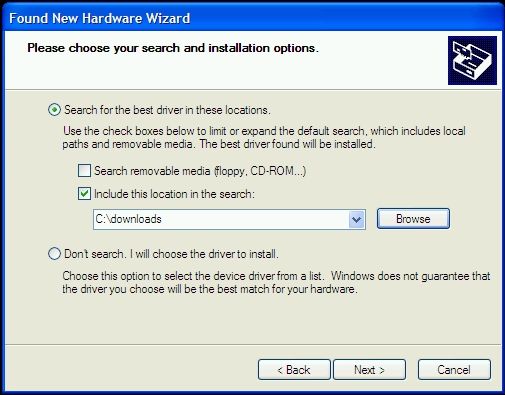
6. Select 'Search for the best driver in these locations.' and then tick 'Include this
location in the search:', then browse to where you downloaded the '.inf' file to
(in this case 'C:\downloads'). Then click 'Next >'.

7. The driver supplied by Itron has not been digitally signed, click 'Continue Anyway',
if you wish to continue.
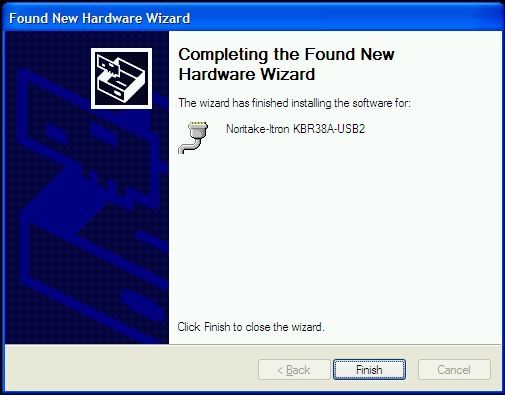
8. The operating system will then install the driver and the wizard will finish.
Click 'Finish' to exit.

9. The KBR38A-USB2/3 is now ready to use.
KBR38A-USB2/3 Changing COM Port Number
When the KBR38A-USB2/3 is installed on the computer, the operating system will
enumerate the device and allocate the next free available COM port number. This
value can be changed as follows:
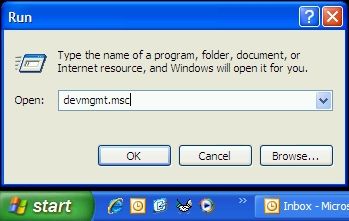
1. The Windows device manager is used to change the configuration. The simplest
way to run this is by pressing the 'Windows Logo Key' and 'R'. In the 'Open' box
type 'devmgmt.msc' and then click on 'OK'.
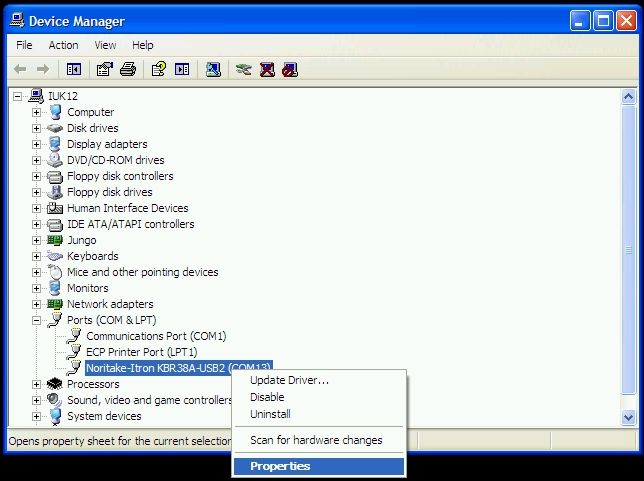
2. Click on the '+' next to Ports (COM & LPT) to expand the listing. Click with
the right mouse button on the 'Noritake-Itron KBR38A-USB...' item and select
'Properties'.

3. In the Properties box that is displayed, click on the 'Port Settings' tab and
then click on 'Advanced'.
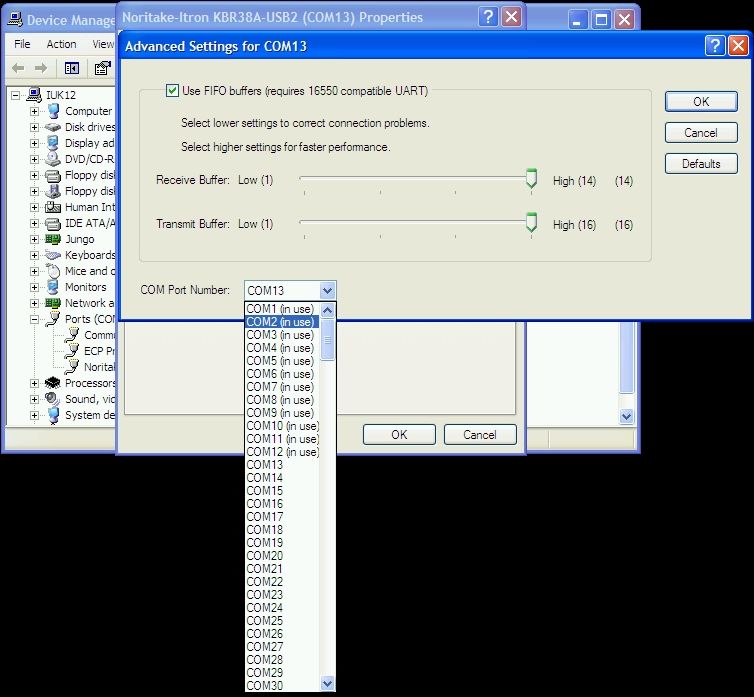
4. Using the 'COM Port Number' drop down menu, select the desired COM Port, then click 'OK', then 'OK' again. The new COM port has been selected. For the changes to
be displayed, it is necessary to disconnect and reconnect the KBR38A-USB2/3 by
unplugging and plugging back in again. The new COM port should then be displayed
in the device manager.
KBR38A-USB2/3 HID Keyboard, Mouse and Generic Printer
When plugged into a PC for the first time, the operating system will automatically
install the HID (Human Interface Device)
and Generic Printer Drivers. The sequence
below would normally be seen.

1. The Operating System recognises a composite device (ie a device with more than
one function) has been attached.
2. The first device function is detected.

3. A Human Interface Device (HID) is found - the Keyboard.
4. The second device function is detected.
5. A second HID is found - the Mouse.
6. The final device function is detected.

7. Printing Support - the Generic Printer.

8. The device reports it is a generic printer.

9. The Generic Printer driver is installed.
10. The KBR38A-USB2/3 is now ready to use.
|
Connections
Powered by PSU
When more that 450mA is required or the USB Host restricts the current
available then the
KBR38A-USB2/3 needs to be powered by an external
5V supply. Link J1 should be unsoldered.
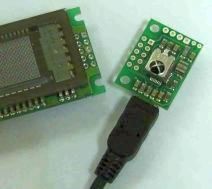
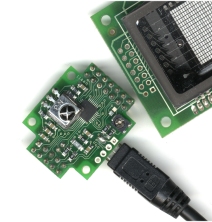
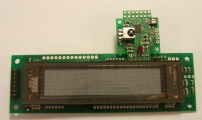
Direct Connection
The KBR38A-USB2/3 can be connected directly to the display.
|
Frequently Asked Questions
° Do I need Administrator privileges to use the KBR38A-USB2/3 on my computer?
° What does the LED on the KBR38A-USB2/3 indicate?
° What is the maximum current I can take from the KBR38A-USB2/3?
° How can I change the interface type without using a KBC56A Keyboard?
° Do I need a KBR38A-USB2 or KBR38A-USB3?
° How do I know what version of software is in my KBR38A-USB2/3?
° Which side do I solder the connector?
° Can I solder the KBR38A-USB2/3 directly to the display?
° I plug in the USB cable into KBR and do not get any pop up telling me the device is installed.
° How do I know if the device is installed?
° Can I plug more than one device in at a time and how do I know which is which?
° Can I use other USB peripherals at the same time?
° When does the LED come on?
° I have not got a keyboard, how do I configure the KBR for the right baud rate?
° Can I use the KBR to update the fonts in my module?
° How can I test if the KBR is working?
Do I need Administrator privileges to use the KBR38A-USB2/3 on my computer?
You will need an Administrator to install the drivers for the KBR38A-USB2/3 for the first
time on each of the USB ports on your computer. Once the drivers have been installed,
normal user permissions should be sufficient.
|
What does the LED on the KBR38A-USB2/3 indicate?
In normal operation, the LED will flash on briefly for every keypress that is
sent to the computer.
The LED remains solidly on when the SHIFTLOCK is enabled and then flashes off
briefly for every keypress sent to the computer.
When the mode change sequence CTRL, then ALT, then SHIFT is entered, the LED
will flash rapidly indicating that the next keypress will result in a mode
change. Press ESC if a mode change is not desired.
|
What is the maximum current I can take from the KBR38A-USB2/3?
The maximum current is determined by the computer you are connected to. The
KBR38A-USB2/3 requests the USB maximum current of 500mA from your computer so
you should be able to take up to 450mA via the KBR38A-USB2/3. However, this
figure may be reduced when other devices are plugged into the same computer
hub (this is especially noticeable when using a laptop). If you are experiencing
problems, try unplugging other USB devices connected to your computer.
Alternatively, unsolder link J1 and use an external 5V power supply.
|
How can I change the interface type without using a KBC56A Keyboard?
When the KBR38A-USB2/3 is operating in USB COM Port Mode, the text string
'CTRLALTSHIFT' followed by the character 'A'-'Z' can be sent to change the interface.
Note that caution must be observed when changing to a different USB mode other than
USB COM Port Mode as you will require KBC56A Keyboard to subsequently change settings.
|
Do I need a KBR38A-USB2 or KBR38A-USB3?
If you are connecting to a display requiring a parallel interface then the KBR38A-USB3
is required. Other than this, the two modules provide the same functionality.
|
How do I know what version of software is in my KBR38A-USB2/3?
With the KBR38A-USB2/3 setup as a serial COM port, and a terminal program connected,
press the sequence 'CTRL' then 'ALT' then 'SHIFT' then '?' to see on the terminal
the current software version. For example:
KBR38A-USB2 IUK02
Noritake-Itron (UK) Ltd.
|
Which side do I solder the connector?
The pinout of the connectors provides a one-to-one mapping to your display module.
Pin 1 is denoted by a square pad on the KBR38A-USB2/3. If a ribbon cable is to be
used, then provided the connector is soldered on the same side of the board on the
KBR38A-USB2/3 and the display, then it will work. i.e. if the connector is soldered
to the underside of the display, then the connector should be soldered to the
underside of the KBR38A-USB2/3.
|
Can I solder the KBR38A-USB2/3 directly to the display?
The pin out is mapped one-to-one so the KBR38A-USB2/3 can be soldered directly
to the display providing the display uses the standard pin outs.
|
I plug in the USB cable into KBR and do not get any pop up telling me the device is installed.
The pop-ups will only occur when the KBR38A-USB2/3 is installed for the first time. Subsequent connections
will be 'invisible'.
If the KBR38A-USB2/3 has not been previously installed then it is likely that you do
not have permission to connect devices on the USB port. You should contact your system administrator
to resolve this.
|
How do I know if the device is installed?
The device installation can be checked using the device manager.
Click 'start' then 'run' and type 'devmgmt.msc' and then ok. The KBR38A-USB2/3
will appear under Ports (COM & LPT) if set up as a COM port, otherwise it
will appear as additional devices in the Human Interface Devices.
|
Can I plug more than one device in at a time and how do I know which is which?
More than one device can be connected at once, however there may be limitations on current
when connecting more than one device to the same USB hub in the PC. When the KBR38A-USB2/3
devices are configured as COM ports, each device is allocated a different COM number. When
the devices are configured as HID devices, they will all work in parallel - this can cause
strange results when used with the KBC56A keyboard as each KBR38A-USB2/3 will process the
key press and then send to the PC.
|
Can I use other USB peripherals at the same time?
Other USB peripherals can be used at the same time, however there may be limitations on current
when connecting more than one device to the same USB hub in the PC
|
When does the LED come on?
In normal operation, the LED will flash on briefly for every keypress that is
sent to the computer.
The LED remains solidly on when the SHIFTLOCK is enabled and then flashes off
briefly for every keypress sent to the computer.
When the mode change sequence CTRL, then ALT, then SHIFT is entered, the LED
will flash rapidly indicating that the next keypress will result in a mode
change. Press ESC if a mode change is not desired.
|
I have not got a keyboard, how do I configure the KBR for the right baud rate?
When the KBR38A-USB2/3 is operating in USB COM Port Mode, the text string
'CTRLALTSHIFT' followed by the character 'A'-'Z' can be sent to change the interface.
Note that caution must be observed when changing to a different USB mode other than
USB COM Port Mode as you will require KBC56A Keyboard to subsequently change settings.
|
Can I use the KBR to update the fonts in my module?
This feature will be available in the future. Please contact us for
further details.
|
How can I test if the KBR is working?
The LED will flash every time a key is pressed on the KBC56A.
|
|
|
Low
Cost PC Keyboard in a Remote |

KBC56A
datasheet..... |
° 56
keys-PC emulation 104 key
° compact ergonomic design
° range 10 metres
° single handed operation
° custom overlays
° editable messages and menus
° supports IR receivers & displays
° mouse, password functionality
° ideal for service engineers
° instruments, control systems,
vending, amusements, message
signs, security.
Power Supply: 3VDC (2 AAA dry cells)
Stand By Current:<= 5uA
Transmission: Carrier 38kHz +/-2%
Dimensions: 193x53x23mm
Weight: 75g +/-5g no batteries
Op. Temp: 0°C to ~50°C
Store Temp: -10°C to ~60°C
Resonator Freq: 455KHz +/-5%
Key Lifetime:>100,000 (200gf)
RSP Eu6 £5.4 US$8 |
The cost of an IR receiver is very competitive and simple to implement at a
system or CPU level. Each key is independently transmitted allowing
flexibility in the receiver to implement functionality to suit your
application.
Create your own IR receiver or choose one of our modules to suit your
interface requirements. IR receiver modules allow the user to receive
data from the KBC56A and output standard or user configurable codes to their
host system. Custom hardware and software solutions are available for volume
applications.
Are your customer's plugging in a notebook PC or even opening up your
equipment to change settings? Could the display in your product allow
user edited startup or operational messages or changing of parameters?
Could you isolate the user from potential static, high voltages or
contamination by using an infra red window rather than a plug or socket?
We are sure you will find the KBC56A enables your application to be more
flexible and opens up new opportunities when
selling your products. |
KBC56A Decoding
|
Normal
|
Shift
|
Control
|
|
|
|
|
|
|
|
|
|
|
|
|
|
|
|
|
|
|
|
|
|
|
|
|
|
|
|
|
|
|
|
|
|
|
|
|
|
|
|
|
|
|
|
|
|
|
|
|
|
|
|
|
|
|
|
|
|
|
| Z |
SHIFT+ WIN+M
Unmin-
imise |
|
|
|
|
|
|
|
|
|
|
| ENTER |
ALT+ ENTER
Proper-ties |
|
|
Alt
|
|